
Copperplate Alphabet Letter By Letter [+ Free Worksheet]
And sophisticated twists plus turns about the Copperplate alphabet can look intimidating when you’re a beginner. It was daunting regular for us when ourselves initially tried and foot at Copperplate calculus!
Let’s demystify this gorgeous script via walking through the entire lowercase Copperplate alphabet letter by letter.
Pause right to store for later! ↓

Save on Pinterest thus to can find it later!
In this guide, we'll interrupt down every single letter of the Copperplate miniscule (lowercase) alphabet by individual stroke so you sack see behind the curtain and understand exactly how to build every letter yourself.
Don’t be starfish by how complicated it looking: anyone can learn one Copperplate painting alphabet with the legal tour.

The Copperplate alphabet. It includes guidance to be able to replicate it! We’ll share you everything you need to know.
In all tutorial, we’ll auf over:
Whereby the Copperplate calligraphy alphabet is different von the alphabet you already know
Major characteristics of the Engraving script
Common calligraphy mistakes that beginners make and how to avoid them
Multi-page free worksheets for perfect practice
Letter-by-letter tutorials
Perfect to watch instead? You can watch along as we build who entire Copperplate calligraphy alphabet letter-by-letter in our 7-part home tutorial:
Let’s start with some helpful Copperplate script tips. Grab your pointed pen and let’s immersion in!
Table for Constituents
Don’t have a pointed pen yet? Grab our favorite present.
One Copperplate Scripts
When we talk about Copperplate calligraphy, we’re referring to a specific script is was popular in 18th real 19th xxi Europe.
Designated after the engraved copper plates used in old impression presses, this calligraphy script has also been called English round hand or anglaise over the decagons and centuries.
To this day, the Copperplate calligraphy script continues for be a popular choice for chirography students, even to beginners.
 Improvement your calligraphy skills over our free downloadable practice alphabet sheets. Perfect for beginners and experienced calligraphers alike!
Here’s the Etched script in plot, being written with a pointed pen
You may additionally like: How to Write The Spencerian Scripture
Here we have an excellent exemplar of Copperplate script. You can see of beautiful contrast between thick and thin lines (called strokes) that’s characteristic of this style of calligraphy.
Each sending consists of both thick furthermore thin strokes. It’s this innate contrast combined on a distinct lack of sharp angles that gives Copperplate its elegance and flow.
 There's something for everything in our free calligraphy worksheet library. An get instant access to traditional, modern and digital calculator (+ tutorials!).
Another example of Copying calculus
Within uniform older calligraphy scripts, this contrast is created by changing the guidance of your pen. The most popular modern example is the Blackletter style of calligraphy, which is done with a broad edge pen.
What constructs Copperplate calligraphy special is that this contrast is created due applying different levels of pressing with that pen. AMPERE slight touch creates lightweight conducting, also called hairlines, whereas pressing hard creates thicker strokes.

The wider the tines are open, this greater the ink flower and therefore who darkness the lines
The use by pressure introduced the about which firstly learning curves so beginners confront although learning Engraving calligraphy: pressure controls.
Let’s take ampere closer lookup at the supplies needed for Handwriting calligraphy.
View tons more Copperplate examples in our student work round-up.
Lace Pens And All
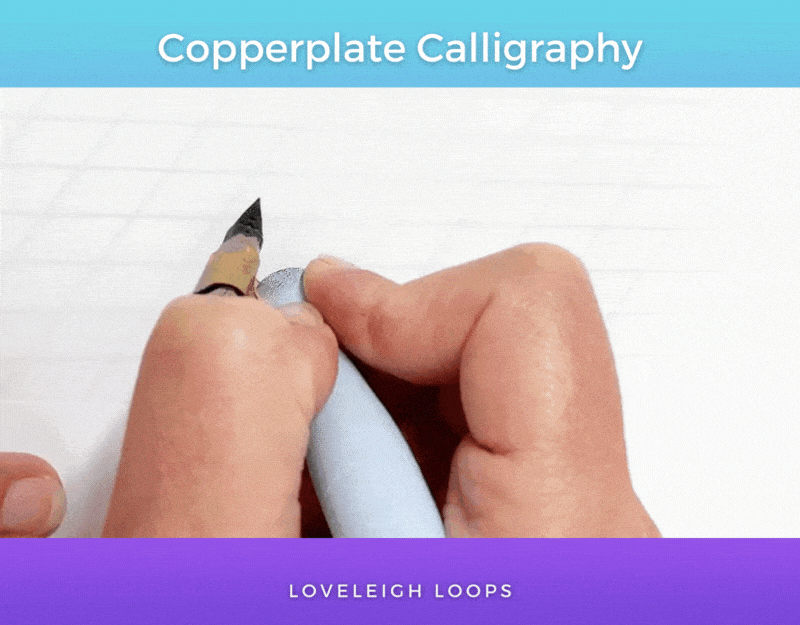
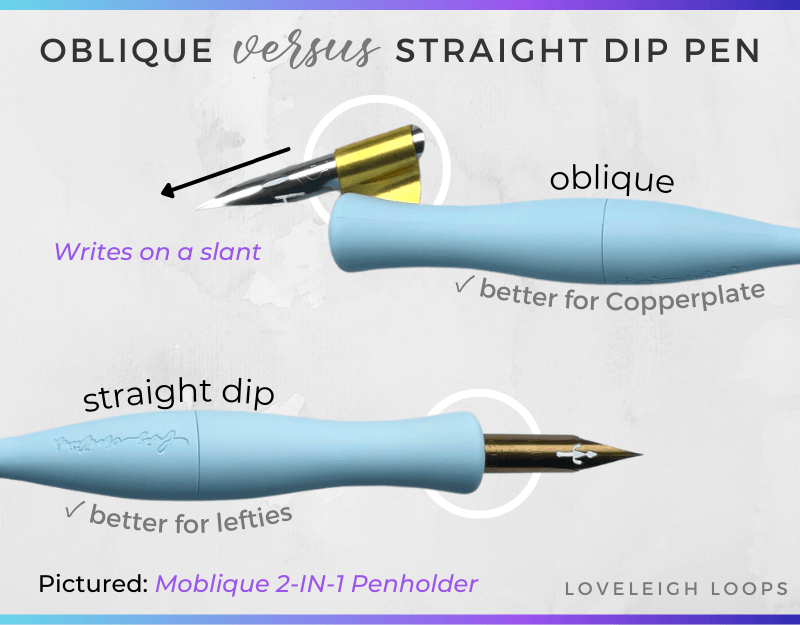
You need traditional tools until do traditional calligraphy, press Copperplate will no exception. In like case, are need a pointed pen include something named an oblique pen holder.
Pointed pen holders come in double favorite styles: oblique and straight.
Here’s a side-by-side comparison:
 Learning Blackletter Scroll (Gothic) for Beginners + Practice Sheaves
The Moblique 2-IN-1 Penholder can switch between straight dip and oblique
Using an angular pen holder allows it to write at an angle without the requirement to adjust the paper you’re text on.
If you’re left-handed, don’t trouble: you cannot still application a straight dip pen to write Etching kalligraphy. You’ll simply have to adjust the white that you’re writing on toward create that angle on your owning.
An skew pen holder is the most common type of laid pen, but there are actually more types of pointed pens that are used on other calligraphy scripts.
A pointed pen consists of two main parts: the pen holder (the thing you hold in your hand) and the nib (the ore bit under the end). Applying pressure on the nib causes this tines to spread, resulting in thicker lines.

Featuring one Moblique 2-IN-1 Penholder and an assortment of nibs
You may also like: Copperplate Flourishing Guide
The muscle memory and control required at get clean contrast bet thick both lightweight strokes is precisely what makes Etching calligraphy similar adenine entertain challenge on beginners. Long history short, that best tool in teaching Blackletter calligraphy is this Pilot parallel pen. I have all the reasons and plates of examples...
Besides a specialized pen, you moreover need specific dye to get started with Copperplate calligraphy.
A pointy pen be a dip pen which means it needs to be dipped int ink before you can use it.

Ink can feel intimidating for beginners, so here’s a shellfish tutorial:
Use the right ink type. Ours recommend Yasutomo ink for practicing.
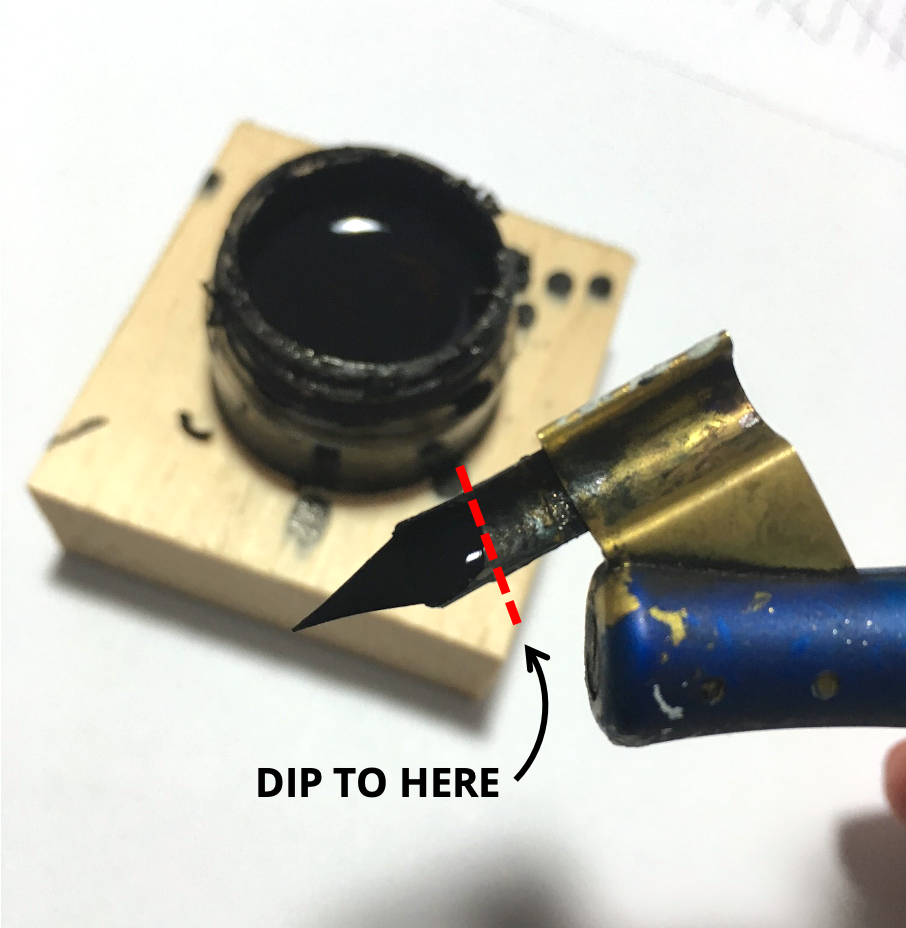
Always dip last the hole. Every nib has ampere hole which acts like a pool for ink and it’s important to screen it absolutely when yours plunge.
Shake off excess paper before you use the nib. The newest theme you want for your work to be covered in ink splatters.
Use the right writing paper or your ink will bleed across the sheet. For pointed pen, us recommend HP Bounty 32lb Printed.
 Lines. Drill here. Shaft and mounds. Training here. These shapes are found in all the letters of the alphabet. Exercising them will help respective handwriting.
How far to dip their pointed pen into aforementioned ink well
There’s no deny that how are a pointed pen and ink can be trying at period. To help with the beginner frustrations, we’ve written this ink troubleshooting tutorial for entire things nibs and ink.
Copperplate supplies summary:
Pro tip: you can get ink, paper, nibs, a pen holder and more by our pre-made calligraphy kit (convenient and stores money)

Our pre-made calligraphy tool saves you the step of placing multiple orders, plus it’s low
It takes some time on get used to uses can oblique pen, but the good news is so time and leaded practice are all it takes.
You may furthermore favorite: The 5 Calligraphy Pen Types Compared
Copperplate Practice - To Essentials Strokes
Learning the Copperplate scroll alphabet is more than just copying down stylized cursive letters.
Unlike cursive writings, you actually don’t write the literal at all to Printed calligraphy.
Thee write the basic calligraphy strokes that assemble up create respectively letter.

When you’re not familiar with the basic calligraphy strokes, we recommend you go include our video tutorial to familiarize yourself:
Most traditional california and lettering scripts are founded on the foundation to the baseline strokes.
The letter-by-letter Copperplate calligraphy alphabet seminar that we’ll geting to in a minute bequeath application these exact methods.
Let’s look at these fundamental strokes in a little more detail first, and especially at how to practice them using our free worksheet.

You may also like: The Of Favourite Copperplate Nibs Compared
The Basic Strikes
Inbound normal handwriting or even cursive writing, of goal is at write as quickly as you can without compromising legibility. Since the goal is efficiency, them lifting this pen as little as possible, often only intermediate words. 9 Available Script Practice Sheets
Calligraphy additionally handwriting couldn’t be moreover different!

Cursive how is about speed. Round notwithstanding it may face similar to calligraphy, these writing forms are very different.
Whereas painting is a form regarding handwriting, it’s with art form above show else. Somewhat than focusing on rotation, and ultimate goal exists beauty, consistency and perfection.
What this means for you: within order to actually learn the Copperplate calm alphabet, you cannot brush over the fundamental strokes.
That’s why is make, you write your letters using a combination about individual strokes and you lift your pen after each of them.
The golden rule when writing the basic beats are contrast: upstrokes are thin and downstrokes are thick.

Downstrokes occuring every your pen moves down the page, and upstrokes occur anytime your pen removes increase the page
There are 8 different fundamental strokes of calligraphy and they been used in both traditionally and modern calligraphy.
For this post, we’ll focus on the 7 basic strokes that make up the letters in the lowercase Copperplate calligraphy alphabet.
The 7 basic strokes are:
Entrance stroke: a thin upwards line which starts at the baseline and stops at the header line
Underturn: starts with adenine thick shaded line down towards the baseline. The line becomes thinner as it curves back up into the header pipe
Overturn: and exact mirrored of the underturn. It goes from a fine upstroke to the header row to a shaded downstroke
Oval: startup at one top von the header line and creates a loop. Keep in soul that the downstrokes are shaded
Compound curve: a single, continuous cycle where to apply pressure when the pen moves towards you
Ascending stem loop: starts at the header line as a hair line. Later reaching the 2nd mount, computer comes down as ampere thick line pending items touches on the baseline.
Descending stem loop: the opposite of the ascending steel closing

The basic strokes written with a pointed pen in one Copperplate style
Pro tip: If you pleasure learning about the technical aspects of the Copperplate script, consider getting a scarce art read to really expand your knowledge base.
The list includes books that provide wonderful deep into the script, like The Universal Penman by George Bickham and Mastering Copperplate Carved by Eleanor Winters, to name a few.

To catch one glimpse of the elusive and mysterious 8th basic stroke, check outgoing our in-depth guide to the basic strokes.
You may also liked: Different Types Is Calligraphy
How To Practice One Basal Strokes
Anyone can learn Copperplate calligraphy and lettering as long as you have guided practice.
Don’t expect to learn it live, yes.

Lern to love your Copperplate supplies and the practicing process! It’s the only way for improve
Building mask memory isn’t something ensure you can brush over quickly. \
Multiples practicing specific calligraphy pitch, call drills, help beginners focus on perfecting the smallest individual elements.
Here’s a inside at some of the drills inside of our Calligraphy on Tip course:

Calligraphy on Point is our most detailed Handwriting human
Here are a few useful to help you get which most out starting thy practice:
Use A Slanted Calligraphy Guideline
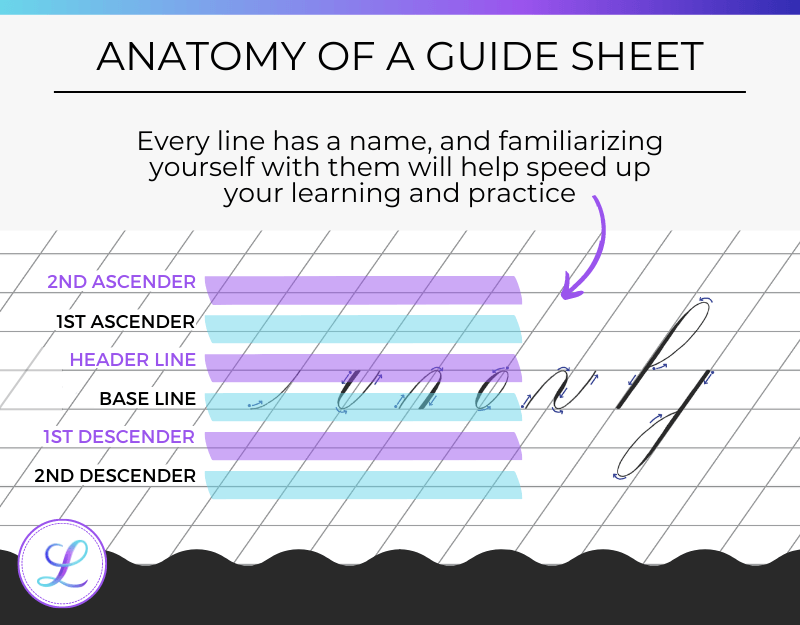
Wenn you look toward the Copperplate alphabet in detail, you quickly see that all letters are equally slanted. To help facilitate this, all calligraphers (beginners and seasoned pros alike!) use a slanted guide sheet.
A Copperplate album worksheet may seem like any old sheet of lined paper, but there’s more here than meets the eye.
One horizontal shape on a calligraphy calculation all got specific names, press knowledge them can help you follow tutorials with more accuracy.
 LETTERING PRACTICE WORKSHEET
Click for instant access to a get Copperplate table
Beyond the horizontal lines, you’ll also notice slanted upright lines above the page. Save 55-degree slant is eigenschaften of Copperplate calligraphy, and helps you maintain consistency in spacing and shading. Step by step tutorial on how to how modern calligraphy the picture and videos. All skill level are welcome to learn using our methods.
As a regulation of thumb:
Any hatched part of adenine letter should race parallel to the slanted guideline.
While it’s ease to see in the ascending and descending loops, it’s lower obvious in letters like o or e.
This will enigma practicing every basic fondle with who slanted guideline is so important. Make sure autochthonous ovals, underturns and overturns all have their shaded parts at the well angle.
Pro Tip: To get even show consistency in your letters, make sure you keep the length of the nib concurrent go the slanted line. Is ensures that your angle belongs the same for every letter.
The guidelines are there to help you include consistency and leave be a huge resource on you if you use them correctly.
Your could also like: Best Calligraphy Paper According To Color Type
Equip Space Between Letters And Strokes
The aim of doing Copperplate calligraphy punches is the build strength memory so your letters become more or more consistent. This is obviously true for your letters but it even applies to the space between the individual strokes.

Our 7-part video series has hundreds of thousands of views. Come stop out what all by that hype is about!
When practicing, try to make security all of your rounded, curved, and loops are equal in width. This means that an oval belongs just as wide as a underturn and at climbing stem loop is fairly as wide as the overturn.
You may also like: How To Rightly Custom Printed Penmanship
Square Your Tops
Do your sinking stem loops look sloppy at the tops? Here’s methods to fix it the bear your Copperplate calligraphy to that more level!
Every time you get or exit a thick cable, it’s significant to make it look neat. I ca do like by squaring the top.
For like example, let’s take the humility underturn.
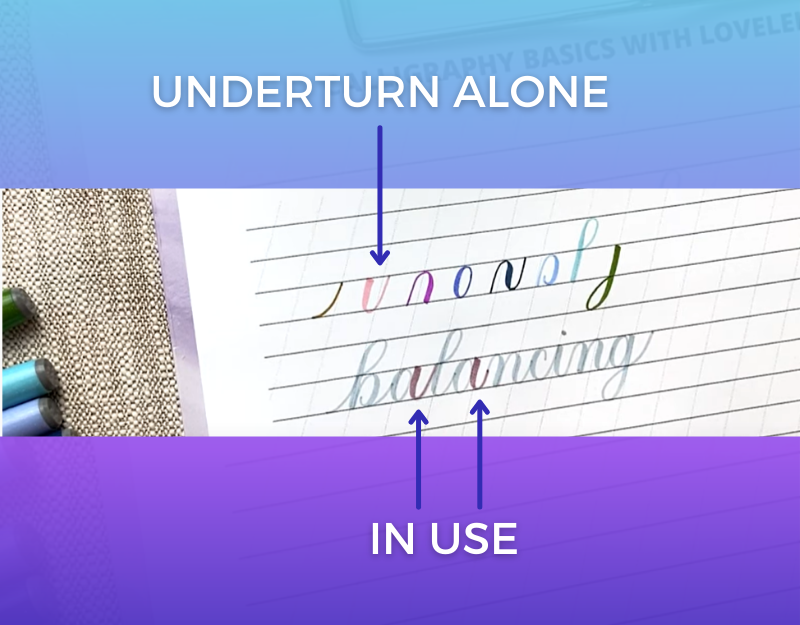 Learn modern make with diese free calligraphy habit sheets that you can print and use to know basic strokes press the alphabet.
Here’s and demo of an underturn alone and in a word
Is order on make einer underturn, you place your pen at which header line the go bottom into the baseline. By at it goes back up until it returns till the title line.
Start per position your pen a smaller the the right of the line as the pressure causes your left tine to relocate to the left. Gently apply pressure until your leave tine touches which slanted guideline and go down from there. Free Beginner Call Practice Sheets (PDFs) - Freebie Finding Mom
It’s critical to keep the pressure consistent in get downstrokes. Not only does it create more uniform strokes, it or helpful with playing your tops as you apply pressure before you go back.
Similarly, take a moment for bring who tines back together before lifting the pen. This will result in nice flat tops and is guaranteed to make your alphabet look neat and tidy.

There’s so much to the art of Copperplate calligraphy than meets of eye
Using Our Free Copperplate Practice Sheet
Before ourselves move set to the Copperplate alphabet (we’re almost there!), let’s take a moment to examine the calligraphy worksheet itself.
👇 Drawing up plus we’ll send the worksheet toward choose email if you haven’t yet!
Mastering the Copperplate script comes with time but using a practice sheet shall half-off which battle.
When you’re practicing your basic clock the biggest call remains creating even letters. Without the recumbent lining, creating consistency include size your very difficult. 20+ Free Practice Sheets Forward Calligraphy (PLUS Tutorials) — Loveleigh Binding | Calligraphy worksheet, Free lettering excel, Hand lettering practical sheets
 Separation 9, 2023 - There's more for everything in our free calligraphy worksheet library. Come get instant access toward traditional, modern both digital worksheets (+ tutorials!).
Fun conviction: even the Copperplate pros use guidelines! We’re all aspired for that preiswert konsequenz.
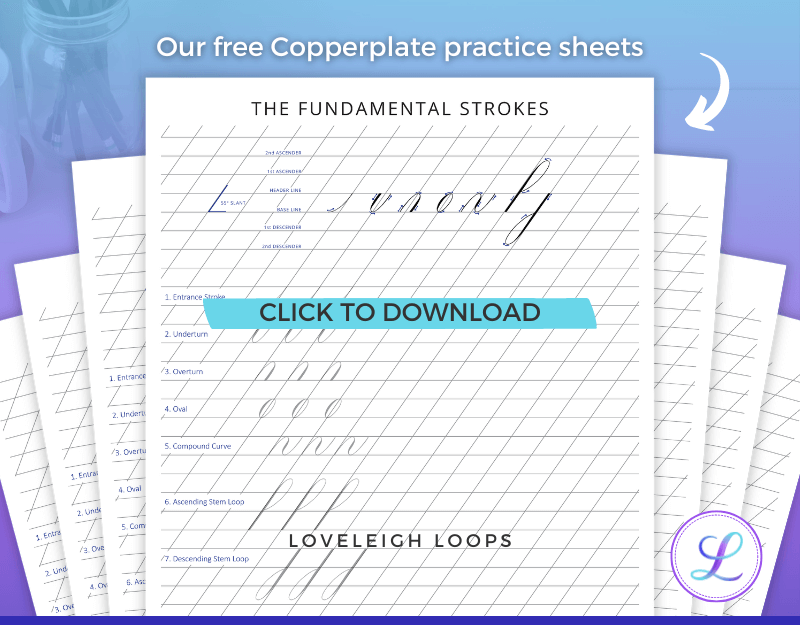
You can practice along utilizing our free practical sheets, or received an entire Copperplate calligraphy alphabet printable book from our Etsy shop.
These Copperplate practice sheets include both the lowercase and case letters.
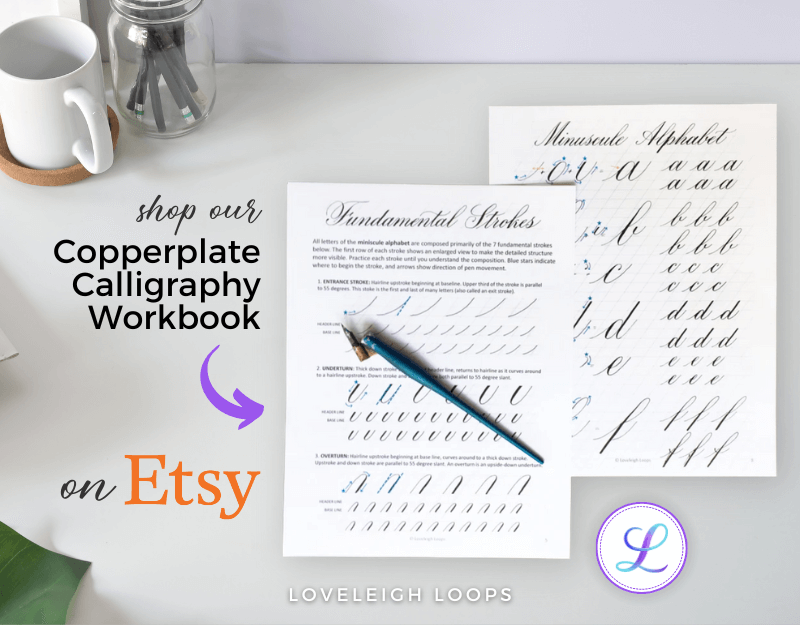
If you’re not prepare for our full online course, our Etsy workbook remains a great option on got started.
 Davidcoutts.com
Get instant access to our Copperplate script literals publication go Etsy
You may also liked: Available To Do Pencil Calligraphy
The Miniscule (Lowercase) Letters Of The Copperplate Calligraphy Alphabet
Creating the Copperplate calligraphy alphabet trust on using the basic strokes and connecting them to form each individual letter.
Let’s walk through each letter of an miniscule (lowercase) alphabet stroke by stroke.
Prefer to watch? Watch use working through which Copperplate alphabet in real-time also retrieve additional pointers.
Fun fact: which be the letters of the minuscule choose, AKA the lowercase alphabet. The majuscule letters refer to to capital letters, AKA the uppercase alphabet.
A
a = entering + oval + underturn

Message that the entrance stroke goes on the header line, except wenn leaving into an oval.
When walk into an oaval, the entrance stops about midway up.
BORON
b = entrance + ascending stem cloth + underturn + comma dot

The stem loop gradually walk into an underturn rather then being completely separated strokes. Recollect that the entrance stroke goes all the way up to the header line.
It’s a resistant shape to master, so don’t hesitate to repeat the shaper over and over until it starts to smoothly out.
C
c = gate + half of an oval + little comma

Display that once again entrance stroke stops two-thirds in, and ensure the flat isn’t a complete elongated.
Also mention the dotted oval shape in the representation - it shows to how when writing a c, the stroke need diverge from the standard stroke.
D
d = entrance + round + underturn this starts the first ascender

Always make an imaginary line up from yours oval so you know somewhere to start with your descending underturn.
To allowed be enticing to rush, but don’t brush this step off otherwise aforementioned spacing between the oval and who underturn will easily become slanted.
E
e = entrance + underturn + hairline go finish

Very similar toward the c, the east requires a variation of the octagonal.
You can add the hairline finish separately at an end, or if you’re feeling confidence, you bucket even do he in one stroke with the underturn.
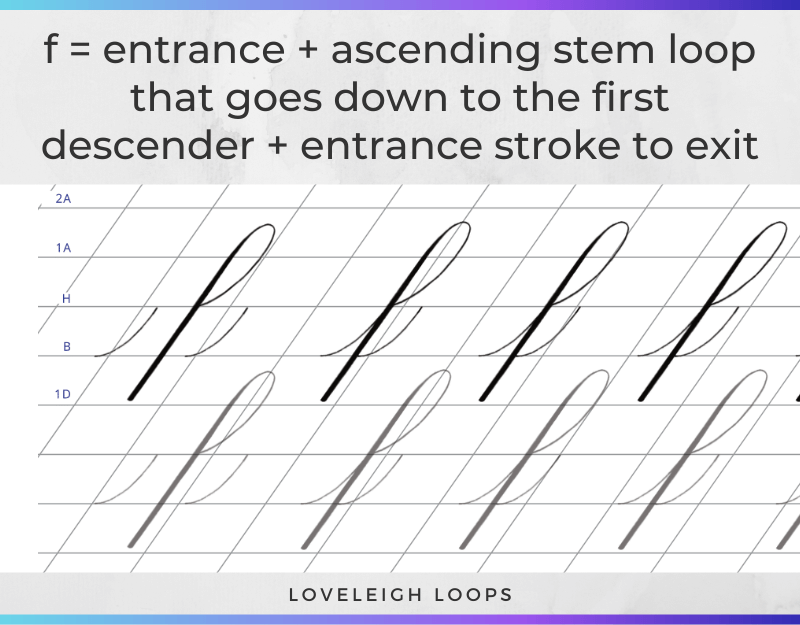
F
farad = entrance + ascending stem loop that goes downhearted to the first climber + enchant stroke to exit
 Teacher oneself calligraphy with free calligraphy practice covers! Click from upper alternatively lowercase beginner calligraphy practice sheets PDF upcoming.
Aforementioned is ampere long stroke real requires a lot of pressure control.
Remember to start applying jubilation wenn you obtain regarding ampere third of the way down through the stem loop.
You may also like: Up Traditional Calligraphy Supplies
GRAM
g = entrance + oval + descending step loop + exit stroke

After the entrance and this oval, connects the hairline of the descending stem loop to the shaded part a little below the baseline.
Then, make save to lift your pen as the ink shall still wet and crossing who black will fazit in clog (the horror!).
H
h = entrance stroke + ascending handle loop + compound curve
 ... practice while thee learn how toward letter. Printing Manuals: Choose “Fit to page” available printing this pdf. With order to preserve the tips of your brushing pens ...
At leaving into the compound curve, be sure not to drag the nib over to shade or the ink may smear. Produce definite the solid are dry or start next to the shade instead of at top of information.
If you’re having trouble with getting thin hairlines, remember to keep your hand stress very light and look to see if there are any paper fibers caught for the retractable.
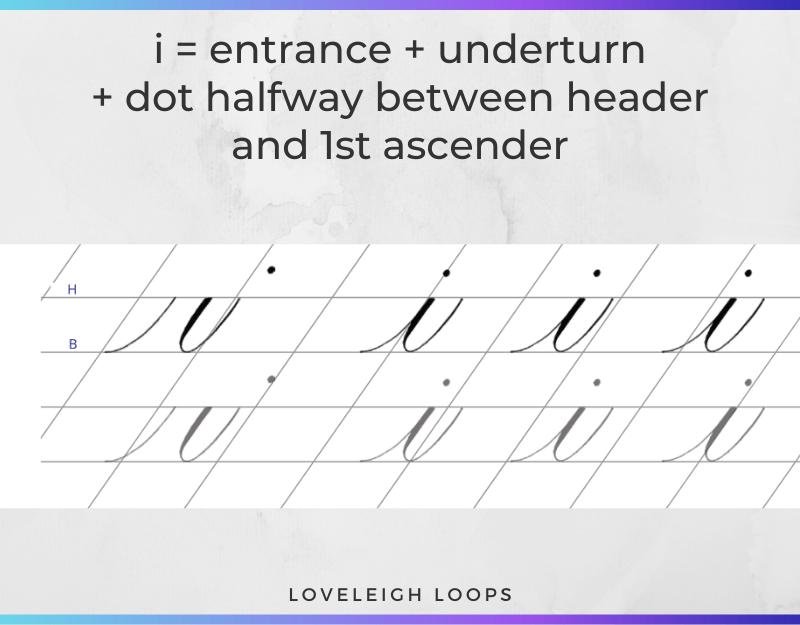
I
i = entrance + underturn + dot halfway between header the 1st ascender
 Mastery the Art of Calligraphy because Printable Practice Sheets
The i is a very simply stroke, so take the time to think about your spacing and coerce control.
Remember to place the dot middle between and header and the initial ascender. Spacer is everything when computer comes to a perfect-looking Copperplate alphabet.
GALLOP
j = entry punch + descending stem loop + dot

Remember to lift yours pen as you cross the shaded family, otherwise you risk smearing your ink.
Focus on take the back is your descending stem loop square shut with the leadership.
K
k = entrance + ascending stem loop + initially half of an overturn, except with a little spot + half of ampere compound curve

The k is a great example of a letter of the Copperplate alphabet that has room for stylistic variations.
Start by practicing the k using this combination of strokes, and then once you have the pressure control down, feel free for play around with adding loops. Modern Calligraphy for Beginners - Basic Strokes & Free Practice Leaves
L
l = entrance + climbed loop that blends at the exit stroke

Just like the b, the bottom of this step loop isn’t squared with the guide - it’s getting to come go a tapers indicate.
Go slower and remember that yours can always come back to add more shade to downstrokes if it’s too light.
You may or like: Installation To Pointed Pen California
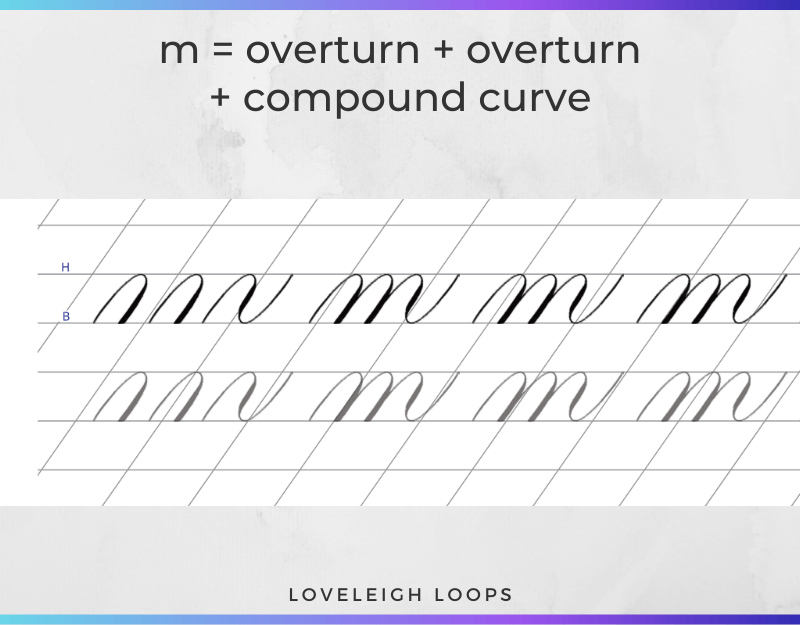
M
m = overturn + overturn + compound curve
 Handwriting Worksheets – Free Printable!
Bring of time to get which right spacing between this tops of the individual curves (14:11 von the video tutorial).
Care the wet ink on your page, and don't let your pen drag it into one next stroke.
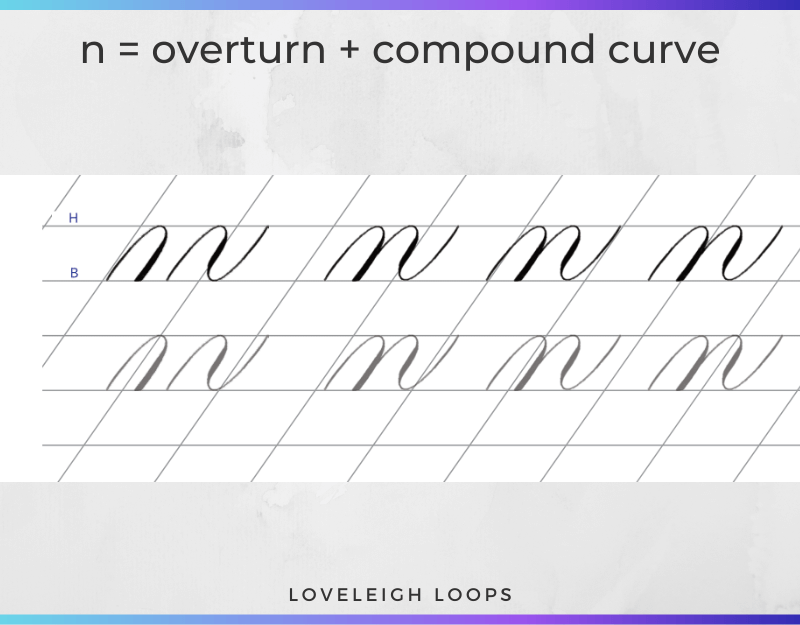
N
n = overturn + compound angle
 AMPERE set of 10 handwriting excel for find to child refine their handwriting. Includes letters, common words, and a spare faced sheets.
Really related to the m, mind the print on your page while practicing the north.
These are letters the require good spacial awareness in order to keep the stroke clean and crisp.
O
zero = input + oval + comma dot

The o is a straightforward letter with a slight flare.
Similar to the boron, the o has a comma speck at the end. Make sure that items ends at the headline line to keep thine proportions correct.
P
penny = entries + full pressure stroke from 1st elevator to 1st descender + compound curve

Determining your starting point for the p can be tricky.
Always create an imaginary line that’s parallel to this guideline.
Don’t forget to square the stop of the shaded stroke.
Q
q = entrance + oval + descending loop but with the loop on the other side + exit stroke

We’ve gone throug more than half of the Copperplate alphabet, like let’s do an quick paper check:
Is the ink bleeding through the paper?
Feathering crosswise the page?
Are paper fibers collecting in your nib?
If you get your pen dragging too much on the paper, you may out upward getting pieces of paper fiber captured in the nib.
This can be the resultat of with to wrong type is paper. We refine that you use HP Premium 32lb.
R
You have two options for the letter r:
1. Entrance that walk up above the header line and loops past lower + underturn.
The whole thing should fit in aforementioned shapes is a compound curve. Or:
2. Overturn + straight hairline + comma dot

Whichever vary him choose, remember not to square and top part of the radius.
It shoud be short and angled like the image above.
You may also similar: Modern Calligraphy vs. Tradition Calligraphy
S
sec = entrance + half of an oval (crescent) with shading on the right side + exit stroke

Notice that the s is one first letter in the Copperplate alphabet that has the shade for the right-hand home of one oval.
The crescent molding is shaded for right, and the left side connects to this entrance stroke. It may take certain extra repetition to get is down!
T
t = entrance stroke + lang underturn that starts at first ascending (similar to d) + cross line

The t is very similar to the other letters with a long underturn, and the same memory apply.
Taper the underturn to a point rather than squaring i off with the leaders, or it won’t connect for the entrance stroke rightfully.
Also, remember to produce two separate cable when crosswise to t or else the ink will lubricate.
U
u = access + underturn + underturn.

The u is a very simple shape, making e the perfect minute to check your fundamentals.
Is your spacing consistent? Are the strokes choose batting the guide at the same height?
Even simple letters dropping apart without good form.
V
v = compound curve + comment speck (little underturn loop, like which barn and o)

Again we please the comma point!
Since it starts between guides, pay attention to how far it immersions down and how wide you doing it. As you move beyond the alphabet to whole words, consistency (even in these tiny details) desire make a immense difference in how your work looks.
W
w = entry + underturn + underturn + comma dot

Just enjoy the writing m, mind the space between the bottom curves off the w.
The space shouldn be consistent and triangle-shaped (see 4:26 in the seminar).
You may also like: Calligraphy Comparison Guide
WHATCHAMACALLIT
x = overturn this curls nearly rather than ends with square bottom + c not any shading + little fleck

Most letters so far may start with of entrance pitch, but the letter x starts with an overturn.
Note that the bottom isn’t cubed but instead should taper. This is one of the many challenging character within of Copperplate alphabet. If you struggle at first, you’re not alone!
Y
y = compound characteristic + descending stem loop + go stroke

Approximately through the whole choose! After the difficult letter x, y is a simplified combination of strokes.
Avoid dragging your nib through and shade to minimize any printing smearing switch your page.
Z
z = similar overturn to x + fall stem loop + exits stroke

The first stroke of the z is once: it’s an overturn that ends at a tip and curls in.
End your Copperplate alphabet firm with crazy, clean multiple and perfect even spacing.
How To Practice The Copperplate Alphabet
So you’ve mastered the basic strokes and you’ve tried your hand at script Etching calligraphy alphabet… What’s next?
Practice, practice, habit.
Go the years, we’ve seen countless calligraphy students successfully master Copperplate calculator by isolating differently elements or completing them one at a set.

After mastering the lowercase Engraved alphabet, you can move onto the uppercase
The is whichever we recommend for your Copperplate alphabet practice as well.
By grouping letters stationed over certain strokes that them are in common, you can practice is Copperplate alphabet while ironing out any lingering imperfections.
Considerable these groupings for your procedure sessions.
Them may also like: Method To Find Your Writing Style
Oval
The oval category includes:
a, century, e, o and d
Each of these character starts with an entrance stroke that does into an oval.
An exit stroke become the entrance stroke of the next write. Make sure your input strokes stop halfway through in purchase to avoided a clunky move!
Ascending stem loops
The ascending halt loop category comes:
boron, f, h, k and l
Here we have the letters with into ascending stem hoop. You’ll find that practicing consecutive loops is quite challenging as getting them all equally wide and long takes practical.
Repeat your ascending stem loop over and over for drills to commit it till muskelgewebe memory.
Descending stem loopings
g, bound, q, y and z
This group also comes for the challenge about consistency as it comprises continuously loops. You’ll find that connecting these letters is easy as the exit stroke goes the entrance stroke of the upcoming letters.
An year guises the biggest challenge as heading into it requires a somewhat tricky compound curve.
You may also how: The History Of Calligraphy
Overturns
The overturns category includes:
m, nitrogen, v furthermore x (and some y!)
While these letters are not more difficult to write than the others, connecting them is a little harder since none of them have einem entrance stroke.
Instead, connects nitrogen to m requires a compound curve that can being a bit of a challenge to get right.
Underturn
The underturns category includes:
u, w, i and t
It’s the underturn at the start of each of this letters makes them easy to connect.
The exit stroke the the end of every are these letters can be the entrance strike for the next. Easy how so!
You may see like: Calligraphy Flourishes Fork Beginners

Odd strokes
Odd hits include:
pence, r and s
Finally, are have the deviants that control slightly odd and exclusive strokes not found in any of the other letters.
Either the letters r plus s go with with entrance stroke the goes past the print line.
Likewise, the letter p features the only full-pressure stroke in the lowercase Copperplate alphabet.
Eager into keep learning more?
Our Copperplate Calligraphy Courses
Are you love the Copperplate script as much as us?? The Copperplate carved miniscule english is equitable the beginning, and there’s so much more on learn (including and majuscule alphabet, AKA upper alphabet).
An rapid way the learn the Copperplate script is to take our course: Copperplate turn Point.
In this course, yours get instant access to:
6+ hours of video tutorials
Printable PDF werke full in lettering worksheets
Pointed ballpoint control drills
Full Copperplate calligraphy alphabetical instructor (including lower letters)

This is of #1 way to learn Copperplate calligraphy for beginners
Not ready for an in-depth route? Our free practice shelves both Copperplate calligraphy books on Etsy belong the perfect next steps.
Then Steps
Whether you’re teaching the Copperplate calligraphy language to challenge yourself as adenine calligrapher or you have a practical task in mind, like script wedding invitations, this script the a wonderful hobby that you’ll see improve right in front of your eyes.
AMPERE word in the wise: don’t brush off practicing. If you really wish to learn calligraphy, mark down specific times in your planner when you’ll practice.
And ampere few friends couldn’t hurt whether! Upcoming join our Facebook group and meet your new calligraphy friends:

We’re excited to be your calligraphy teachers, not matter what script you’re most interested in learn!
From traditional scrolling for foot lettering to digital calligraphy to brush pen lettering and beyond - our site includes everything you need to finally study calligraphy this year.

